Shared Documents
Prerequisite Reading
Shared documents reside in document library. These documents can be included in each to form progressively more complex documents.
What is the Benefit?
In the following diagram we see three rows, each with their own growing complexity.
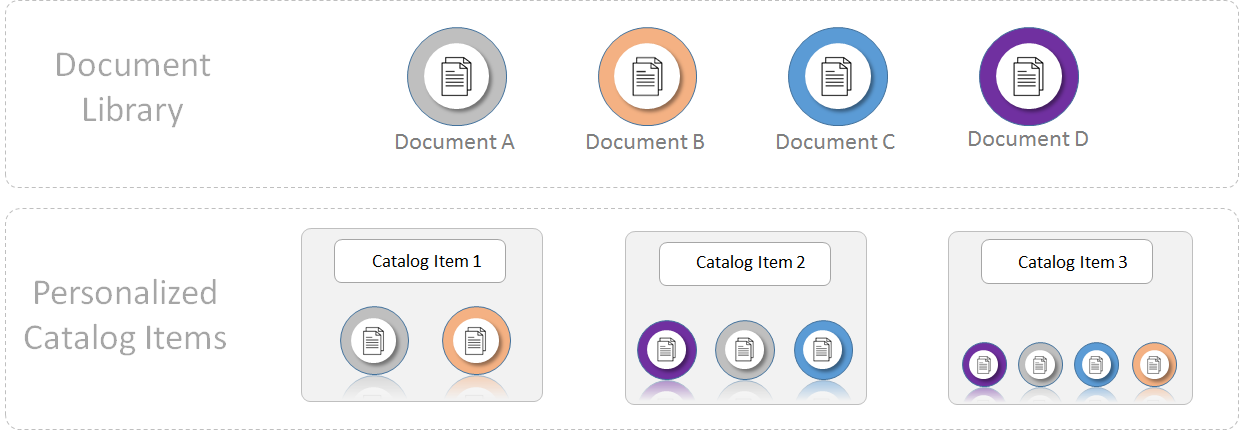
Document Library: The first row shows individual shared documents. This collection of shared documents is generally referred to as the Document Library. Each document in the document library is self contained with no dependencies.
Personalized Catalog Items: When you configure a personalized catalog item, you have the ability to include documents from the document library.
Example
Using the diagram above, you now have catalog items 1 & 3 and both contain "Document B".
Now let's say "Document B" is actually a cover page that must be included in all catalog items in the 'Healthcare' category.
By using the document library you are able to have a single document referenced in multiple places. so, when it comes time to make an adjustment to the cover page, you only have to change it once and the changes are automatically propagated to all catalog item that use it.
In this case there are only 2 Catalog items that use "Document B". But in a real world scenario, items in the document library can be used in hundreds of catalog items.
Note: As a rule of thumb, if you find yourself having to place the same pages in more than 1 or 2 documents, creating a shared document is probably a good idea.
Adding Shared Documents
There are two ways of adding shared documents to the system:
- Add Shared Documents in Designer
- Add Shared Documents outside of Designer
Adding Shared Documents in Designer
To add a shared document in Designer:
- Click
 on a personalized catalog item to edit it.
 - Make sure the "pages" tab is selected in the page navigation panel (it is by default).
- Right-click a page in the Page navigation panel. The following menu will appear.

- Choose the "Add Page After" option.
- Once you do, you will be prompted with the following dialog asking you what type of page you would like to add. as shown below.

The content library is a collection of Shared Documents created by both you and other Administrators in the system.
- Next, choose the "Upload" option.
- You will be prompted to choose the files you wish to upload. as shown below. You can upload multiple files at once.
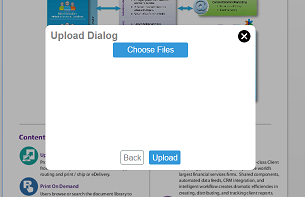
Note: Only PDF documents can be uploaded at this time.
- Once you have selected the desired files, click the "Upload" button.
- ContentWelder processes your files and displays progress indicators for each file.
- Once the import is complete, thumbnails of your documents are displayed and you can click on them to add one to your document.
Moving forward, anytime you need to access these documents simply re-open the "content library" when adding a new page, and you will be able to choose them. To modify a shared document, see "Modifying a shared document" section.
Adding Shared Documents outside of Designer
You can add a Shared Document outside of Designer if you needed to make some tweaks to it after uploading it. To add Shared Documents outside of Designer:
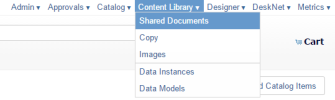
- Go to Content Library -> Shared Documents in the menu as shown below.
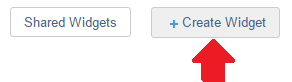
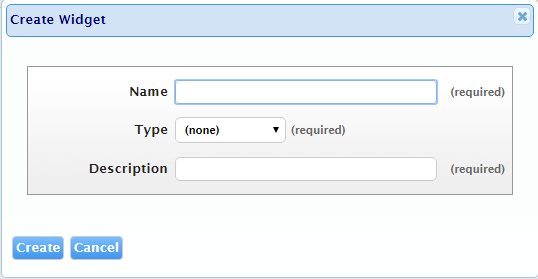
- Once there, click "Create Widget" as highlighted below.
- This will open up a form for you to fill. as described below.

- Enter the Name and description of your document and click "create" when done.

Note: Make your descriptions count.
Keep in mind that your descriptions are the primary means that end users have for understanding the purpose of a document. so make your description count.
If you created a blank Shared Document, you will be redirected into Designer where you can begin Editing.
Otherwise, If you created a Shared Document and uploaded a PDF, the system will process the file. Once the status reaches the "created" step, click the
Modifying a shared document
By now you should be familiar with how to add a shared document to the content library. But what happens if you want to modify an existing document?
To edit Shared Documents outside of Designer:
- Go to Content Library -> Shared Documents in the menu. as shown below.
- You will now see the list of Shared Documents in ContentWelder.
- Search for the document you want to edit and click the edit icon to edit the Shared document.
- This will open up Designer and allow you to make edits.

©2022 DeskNet Inc.
Proprietary and Confidential Information